

Food & Recipes
Hopefully some new food for you to try. Don’t worry, doesn’t have to be spicy.
Some pictures to make you salivate, and some recipes for you to make.
The majority of pictures and recipes have been taken from various publications all freely available on the internet. Some photo’s might be from my house in Thailand prepared and cooked with great expertise by my wife. Obviously I won’t delve too deeply into this as there is so much widely accessible to everyone. But then if you ever thought of doing some cooking yourself, but haven’t, maybe this small page will inspire you to try. Don’t forget not all Thai food is necessarily spicy. You can make it to suit you own taste, and you should. This is how the Thai’s do it. Don’t forget also that not all Thai’s like or can handle spicy food, so don’t feel intimidated by not putting as many chilies as the recipe says.
I’m only going to have a small handful of dishes here as all these things can be found just about anywhere. However I shall have a couple of everyone’s most popular and common Thai dishes, that I have yet to meet any person who would say “no thanks”. Of course I exclude vegetarians and people with certain allergies, etc.
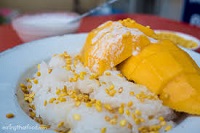
Tom yum goong, pad thai, pad grapow gai, khao man gai and a dessert mango and sticky rice. Think I’ll throw in some som tum just for good measure!
The Recipes
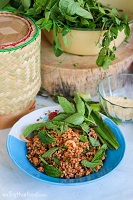
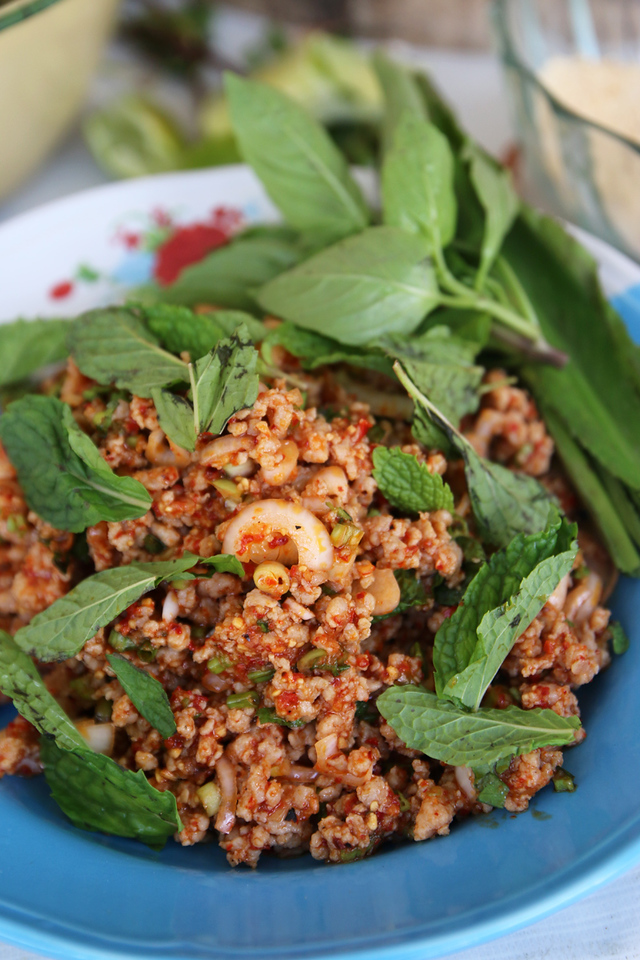
1. Larb Moo.
Thai larb recipe (larb moo ลาบหมู)
Prep time 30 minutes Cooking Time 5 minutes
Thai larb made with minced pork (larb moo ลาบหมู) is one of the most popular Thai streets foods in Isaan cuisine. It’s a wonderful combination of minced pork, lime juice, chili flakes, fish sauce, and herbs to give it a refreshing touch.
Author: Mark Wiens (eatingthaifood.com)
Recipe type: Salad Cuisine: Thai Serves 1-2
Ingredients
Pre-ingredient
- About 5 tablespoons of uncooked Thai sticky rice (but for the actual dish I used about 1 heaping tablespoon after we made it into powder – see directions)
Main ingredients
- 300 grams (1 pound) minced pork (minced chicken or minced beef will also work well)
- ½ – 1 tablespoon of chili flakes (prik bon)
- ⅛ tablespoon of sugar (just a pinch)
- ½ tablespoon of fish sauce (here’s the fish sauce I use)
- 1 – 2 limes (I used the juice from about 1.5 limes)
- 3 – 4 small shallots (Thai shallots are only about the size of grapes, so if you have bigger shallots just use however much you want)
- A few leaves of Culantro – this is an herb also known as long coriander, it tastes a little like cilantro (if you can’t find any cilantro, don’t worry about it, it’s not a must)
- 3 – 5 spring onions (green onions)
- About 20 leaves or so of fresh mint
Instructions
Toasted sticky rice (khao kua)
- First step is to make the toasted rice (khao kua ข้าวคั่ว).
- Heat a frying pan on low heat, toss in the uncooked Thai sticky rice (no oil). Stir continuously, kind of like you’re roasting peanuts or coffee. Toast the rice until it turns from white to golden yellow, almost to the point where it looks like brown wheat. It will also be very fragrant and smell almost like popcorn. It took me about 15 minutes or so.
- Once the rice is finished toasting, and has cooled off a bit, put it into your stone mortar and pestle. Pound the rice until it turns into a coarse powder (a blender or food processor will also work fine). Put your toasted sticky rice powder in a bowl aside.
Larb recipe
- Add 300 grams of minced pork to a small sized saucepan with a handle. Fry the pork, breaking it into small minced pieces, until it’s fully cooked all the way through. For best flavor, leave all the oils that come out (but if you want to be healthier, you can also drain the pork oil, and add in a splash of water instead). Take the pork off the heat.
- Leaving the pork in the same pot, add 1 heaping tablespoon of the toasted rice powder into the pork. Also toss in ½ – 1 tablespoon of chili flakes.
- Add a pinch of sugar, ½ tablespoon of fish sauce, and squeeze in the juice from 1 – 2 limes (I used about 1 ½ full limes, but I like it quite sour).
- Give the pork and the seasoning a quick stir.
- Peel and slice the shallots, finely mince about 5 green onions and a few culantro leaves (if you have them), and just pluck about 20 or so mint leaves off the stem. Throw everything into the saucepan with the pork.
- Give the larb moo a good mix, making sure all the spices and dressing coats the pork.
- Taste test. See if it needs more fish sauce for saltiness, lime juice, or chili flakes. Get it the way you want it.
- Dish it out onto a plate and garnish with more mint leaves, Thai sweet basil, and culantro.
Notes
In Thailand, larb moo (ลาบหมู) is normally eaten along with a plate of Thai sticky rice and accompanied by a plate of som tam (green papaya salad ส้มตำ).
Enjoy!
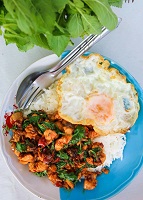
2. Pad Grapow Gai
Thai basil chicken recipe (pad kra pao gai ผัดกระเพราไก่)
Prep Time: 15 minutes. Cook Time: 5 minutes.
This Thai basil chicken recipe (pad kra pao gai ผัดกระเพราไก่) is a true classic. It’s one of the most popular Thai street food dishes. The chicken is stir fried with Thai holy basil, and served on top of rice with a fried egg on the side.
Author: Mark Wiens (eatingthaifood.com)
Recipe type: Stir fry
Serves: 1
Ingredients
For the egg
- 1 egg
- 2 tablespoons of oil for frying
Basil chicken
- 1 chicken breast (or any other cut of boneless chicken, about 200 grams)
- 5 cloves of garlic
- 4 Thai chilies
- 1 tablespoon oil for frying
- 1 teaspoon of oyster sauce
- ½ teaspoon light soy sauce
- 1 splash of dark soy sauce
- ½ teaspoon sugar
- 1 handful of Thai holy basil leaves
Instructions
First, fry the egg
- Heat about 2 tablespoons of vegetable oil in a wok or frying pan on high-medium heat.
- When the oil is hot and sizzling, drop in the egg. Let it sizzle and bubble up, and at the same time, splash some of the hot oil onto the top of the egg (don’t flip the egg, unless you really want to).
- After the egg looks about right to your cooked likeness (I like mine runny), take it out, drain the excess oil, and put it on a plate for later.
Basil chicken
- Cut the chicken into small bite sized pieces.
- Rinse and peel the garlic and chilies, and pound them in a mortar and pestle (alternatively you can just mince them with a knife). They don’t need to be super fine, you just want to bring out the oils and flavors from the garlic and chilies.
- Pluck a good sized handful of holy basil leaves off the stems.
- Now it’s time to start cooking. Heat your wok on high heat, and add about 1 tablespoon of oil to the pan.
- When the oil is hot, add the chilies and garlic. Stir fry them for about 20 seconds or so until they get really fragrant, but don’t let them burn or get too dry.
- Toss in your chicken. Keep stir frying continuously. At this stage you want to continue to stir and cook your chicken until it’s just about fully cooked all the way through (depending on the size pieces of chicken and how hot your fire is, it should take about 2 – 3 minutes). If it starts to get dry, add just a tiny splash of water.
- Add 1 teaspoon of oyster sauce, ½ teaspoon light soy sauce, ½ teaspoon sugar, and finally a splash of dark soy sauce. Keep stir frying for about another 30 seconds.
- Grab a handful of holy basil, toss it into the pan, fold it into the chicken, and then immediately turn off the heat (if you’re using an electric stove, you’ll want to remove the pan from the burner). The holy basil really only needs to cook for about 5 seconds, and it will continue to wilt and cook from the existing heat of the chicken. This step is important because if you cook the basil for too long, it loses some of its glorious flavor and gets slightly chewy.
Notes
Make sure your rice is cooked and ready to be served before you start cooking… believe me on this one, because there’s nothing more disappointing than finishing a pan of pad kra pao gai (ผัดกระเพราไก่) only to realize your rice isn’t cooked yet!
Remember that the ingredients listed here are just a guide – they are the amounts I used – but you should really taste test all the Thai food you cook, and make it according to the way you like it!
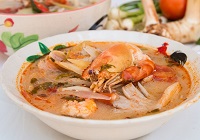
3. Tom Yum Goong.
Authentic Tom Yum Recipe (ต้มยำกุ้ง) with Shrimp
Prep Time: 10 minutes. Cook Time: 20 minutes
Tom Yum Goong (ต้มยำกุ้ง) soup is one of the most well known dishes in Thai cuisine, and in this recipes you’ll learn to make the authentic Thai street food style version. There are 2 different types of tom yum, the clear version and the creamy version, and there’s directions on how to make both types. Enjoy this recipe for tom yum. Be sure to watch the video here.
Author: Mark Wiens (EatingThaiFood.com)

Recipe type: Soup Cuisine: Thai Serves: 3-5
Ingredients
- 2 liters of water
- 4 stalks of lemongrass
- 1 inch chunk of galangal
- 10 kaffir lime leaves
- 10 Thai chilies
- 5 cloves of garlic
- ½ kilo shrimp
- 300 grams of oyster mushrooms
- 2 roma tomatoes
- 2 white onions (medium sized)
- 2 teaspoons of sugar
- 8 – 12 tablespoons of fish sauce (depending on your taste)
- 8 – 12 tablespoons of lime juice (10 – 15 limes)
- Handful of cilantro
Creamy tom yum version
- 3 tablespoons canned Thai roasted chili sauce (nam prik pao น้ำพริกเผา)
- 10 tablespoons evaporated milk
- Taste test, you may need to add more lime juice or fish sauce as the milk and roasted chili sauce throws off the sourness and saltiness.
Instructions
- First thing to do is put about 2 liters of water in a pot to boil.
- Then I like to start by squeezing my limes. This is not the first step of the recipe, but it’s best to have your limes squeezed so when you need them later, you don’t need to rush to squeeze them all. Slice about 10 limes and juice them all into a small bowl, and set them aside for later.
- Take your stalks of lemongrass, and first tear off the outermost leaf and throw it out. Then, I like to use a mallet to lightly pound the lemongrass to release the flavors. Then just slice it diagonally into 1 inch strips or so.
- Take about 1 thumb sized chunk of the root part of galangal, and chop it into slices.
- Coarsely break about 10 kaffir lime leaves – no need to cut them, just tear them – which is going to help release their flavor.
- Peel about 5 cloves of garlic.
- I used about 10 Thai bird chilies (prik kee noo) for this recipe, but you can use however many you’d like. First, take off the stem, and then you can either just slice them in two pieces, or give them a little pound on your cutting board like I did (just be careful of flying seeds). You can also remove the seeds if you’d still like the chili flavor but not as much heat.
- Throw the lemongrass, galangal, kaffir lime leaves, garlic and chilies into the water. You can put on the lid just so it starts to boil and release all the herb flavors quicker.
- Now prepare your shrimp (or whatever meat of choice you’re making tom yum with). Since I used goong mae nam (กุ้งแม่น้ำ), freshwater shrimp, I first chopped off all the tentacles.
- Boil your soup with all the herbs in it for about 10 minutes, and you can go ahead and toss in the shrimp and turn the fire to low.
- Then add your mushrooms, which you should pre rinse beforehand.
- Take two roma tomatoes and two small white onions and slice them into wedges – you want them to be big and chunky. Then go ahead and add them to the tom yum.
- If you’re using shrimp for this tom yum recipe, you might get some foam build up on top of your soup, in which case you can just lightly skim it off the top and toss it out.
- Boil the tom yum for about 2 – 3 minutes.
- Next, add about 6 tablespoons of fish sauce first, and 2 teaspoons of sugar. You may need more of each, but start with that.
- Boil your tom yum for another minute or so and then turn off the heat. You don’t want your tom yum to be overcooked. The mushrooms and onions should be soft, and then it’s ready.
- Once your heat is off, go back to your lime juice and add about 8 tablespoons of lime juice (depending on how sour you like it, I like it really sour).
- Make sure you taste test until your tom yum is perfectly sour and salty. You might need to add more fish sauce, sugar, or lime juice.
- Finally chop up a handful of fresh cilantro, throw it in the soup, and give your tom yum a final stir. The lime juice and cilantro taste fresher and more vibrant when not boiled, so that’s why I turn off the heat before adding them.
- You now have Tom yum goong nam sai (ต้มยำกุ้งน้ำใส), the clear version of tom yum.
For the creamy version of Tom Yum
- For this recipe, I took out about ½ of the tom yum and set it aside as the clear version, and then made the other ½ as the creamy version.
- Turn your heat back on low.
- Add about 3 heaping tablespoons of Thai roasted chili sauce (nam prik pao น้ำพริกเผา) to your soup and stir it in.
- Also about 10 tablespoons of evaporated milk.
- Mix it all in and let your soup heat up for about 1 minute.
- At this stage, you’ll need to taste test and evaluate. The roasted chili sauce and creaminess from the evaporated milk will alter the flavors from the clear version, so you might need more lime juice and more fish sauce. Just keep taste testing until it’s exactly how you like it.
- And there you have the creamy version of tom yum.
Notes
Tom Yum Goong (ต้มยำกุ้ง) is a Thai soup that’s meant to be eaten with a variety of other Thai dishes. It’s not normally eaten as an individual bowl of soup, the way it would be in Western cultures, but instead it’s a communal dish that goes together with other dishes and eaten with rice.
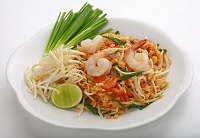
4. Pad See Ew
Pad see ew recipe (ผัดซีอิ๊ว)
Prep Time: 15 minutes. Cook Time: 10 minutes.
Pad see ew (ผัดซีอิ๊ว) is a widely popular fried noodle dish in Thailand. The wide rice noodles are combined with Chinese broccoli, chicken (or other meat), and egg, and seasoned with soy sauce.
Author: Mark Wiens (eatingthaifood.com)
Recipe type: Noodles Cuisine: Thai Serves: 1

Ingredients
- 2 tablespoons oil for frying
- 3 cloves garlic
- 300 grams fresh wide rice noodles (sen yai)
- 200 grams chicken (alternatively you could really use any meat of your choice)
- 1 handful of chopped Chinese broccoli (kailan) – I used about 2 stalks for this recipe.
- 1 egg
- 1 tablespoon light soy sauce dark soy sauce
- ½ tablespoon
- ½ teaspoon sugar
- Garnish with chili flakes, pepper, and vinegar if you like
Instructions
- Comb through the fresh wide rice noodles, making sure any clumps are separated.
- Peel then mince 3 cloves of garlic, slice the chicken into small bite sized pieces, and slice the Chinese broccoli into 1.5 centimeter strips.
- Heat the wok (or frying pan) on a medium heat and add about 2 tablespoons of oil.
- Wait until the oil is hot, and then fry the garlic for about 10 seconds or so, making sure it sizzles in the hot oil.
- Add the chopped chicken to the wok and stir fry for it about a minute until the chicken is nearly all the way white in color and cooked pretty well though and through.
- Now, turn down your heat (or if you’re using an electric stove you can even move your pan off the burner for a moment).
- Toss in the rice noodles, the Chinese broccoli, 1 tablespoon of light soy sauce, ½ tablespoon of dark soy sauce, and a ½ teaspoon of sugar.
- Still on low heat, start to fold the noodles gently by picking them up with the spatula from the bottom, and folding them over (If you stir fry too hard, the stickiness from the noodles can make them turn into a big noodle blob – believe me, I’ve done this too many times and it’s not pretty!).
- Cook the noodles for about 1 -2 minutes. If it gets a little dry, you can drizzle in a tiny bit of oil.
- After the noodles are well mixed, scoot the noodles to one side of the wok, and proceed to crack an egg into the empty side.
- Now it’s time to crank up the heat on your stove – for the final step we want a little char on the noodles and egg for great flavor.
- Scramble the egg, and then fold the noodles onto the egg, sort of when it’s half cooked. Let the heat sear the egg for a few seconds and then start folding the noodles and egg together. With a hot flaming fire, you should get a little char to both the noodles and the egg.
- Fry for about 30 more seconds, making sure to be gentle with the noodles, and then turn off the heat and dish it out.
- Sprinkle a little freshly ground pepper on the top of the noodles. You can also eat pad see ew with a bit of chili flakes on top and some vinegar for taste.
Notes As you can these recipes and links are from EatingThaiFood.com and I encourage everyone who cooks, or wants to try these recipes, please do. A special thanks to Mark Wiens for (hopefully) allowing me to reproduce his recipes directly from his website.